As I mentioned before, I will be using the 32F746GDISCOVERY development board and STM32CubeIDE to code.
Download and install the software if you haven’t already. Then download this repo from GitHub. You can open this project directly in the STM32CubeIDE by double-clicking ‘.project’ file.

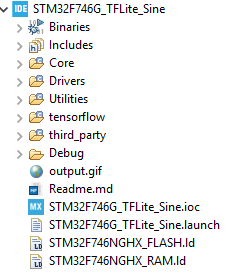
This is what it will look like in the IDE.

Before we explore what is happening in the code, let’s just compile and flash the code right away. You can build the project using the hammer icon, or from Project->Build Project.

Now plug in the board. It should show up as a drive. The driver should be installed during the IDE setup. If your ST-Link (on-board) programmer needs a firmware update IDE will prompt for it. Just follow its instructions.

Now run the program. This will load the binary into the microcontroller.

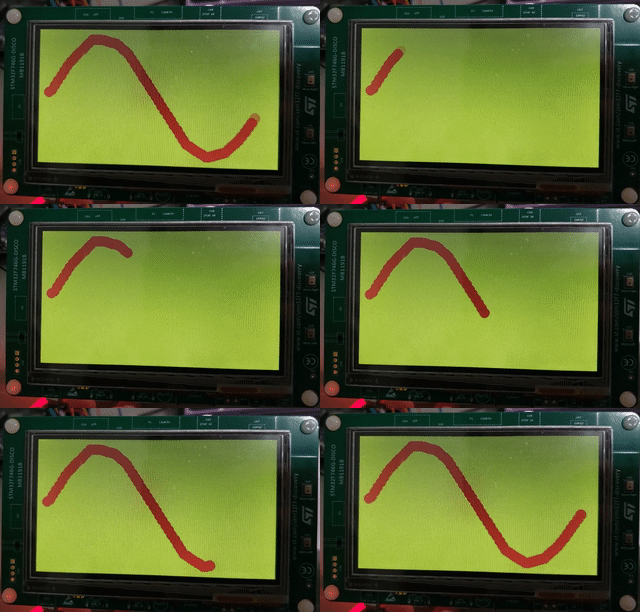
And you should see something like this:

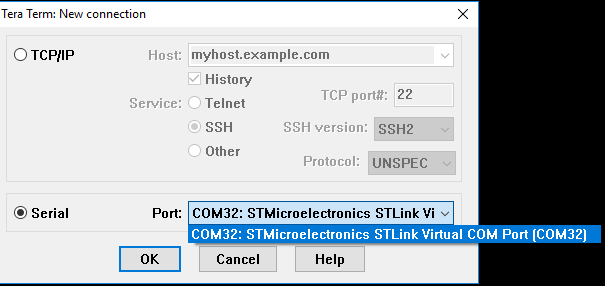
If you have a terminal software (e.g. TeraTerm) connect to the ST-Link COM port (in my case, it showed up as COM32):

Setup the serial port following this:

You should be seeing x and its corresponding y values.

If you get this far kudos to you. Noice!
How to create the project from scratch
- Go to New->STM32 Project.

- Select Board Selector.
- Type 32F746GDISCOVERY in the search box.

- Select the product from the Board List and click Next.

- Give the project a useful name and select C++ as Targeted Language. TensorFlow is written in C++.
- Click Finish.

- Then follow my commits. It is self-documented.
A couple of things that need some clarification:
- This project came with the model files. If you want to use your model files, replace the ones that came with the repo with yours.
- TFLite uses a function called
DebugLog()to print out error messages. The header file is intensorflow/tensorflow/lite/micro/debug_log.h. Printing output using UART will vary by hardware, so it is the user’s responsibility to provide the implementation.debug_log.cis included under theCorefolder and is specific to STM32.
What is happening under the hood?
Let’s open the main.cpp (under the Core folder).
1
2
3
4
5
6
7
8
#include "stm32746g_discovery.h"
#include "lcd.h"
#include "sine_model.h"
#include "tensorflow/lite/micro/kernels/all_ops_resolver.h"
#include "tensorflow/lite/micro/micro_error_reporter.h"
#include "tensorflow/lite/micro/micro_interpreter.h"
#include "tensorflow/lite/schema/schema_generated.h"
#include "tensorflow/lite/version.h"
stm32746g_discovery.h is provided by STM32Cube.
lcd.h is implemented by me on top of the STM32 LCD library to plot the graph.
sine_model.h is downloaded from Google Colab.
all_ops_resolver.h will bring all the operations that TensorFlow Lite uses.
micro_error_reporter.h is the equivalent of printf on serial. It is helpful for debugging and error reporting.
micro_interpreter.h interpreter runs the inference engine.
schema_generated.h defines the structure of TFLite FlatBuffer data, used to translate our sine_model.
1
2
3
4
5
6
7
8
9
10
11
12
13
namespace
{
    tflite::ErrorReporter* error_reporter = nullptr;
    const tflite::Model* model = nullptr;
    tflite::MicroInterpreter* interpreter = nullptr;
    TfLiteTensor* model_input = nullptr;
    TfLiteTensor* model_output = nullptr;

    // Create an area of memory to use for input, output, and intermediate arrays.
    // Finding the minimum value for your model may require some trial and error.
    constexpr uint32_t kTensorArenaSize = 2 * 1024;
    uint8_t tensor_arena[kTensorArenaSize];
} // namespace
You actually don’t need this namespace, but TensorFlow uses namespace to organize everything. Using namespace here will make these variables and pointers unique to this file.
kTensorArenaSize is the space you will allocate for TensorFlow to do its magic. This is to prevent dynamic memory allocation. It is hard to tell how much space you need, you have to guess its size and requires some trial and error. You can start with 1KByte. If it is not enough it will throw an error when you run the program (that’s when the serial output comes handy). Then you come back and increase its size.
1
2
3
4
5
6
7
8
9
10
11
12
13
14
15
16
17
//Enable the CPU Cache
cpu_cache_enable();

// Reset of all peripherals, Initializes the Flash interface and the Systick.
HAL_Init();

// Configure the system clock
system_clock_config();

// Configure on-board green LED
BSP_LED_Init(LED_GREEN);

// Initialize UART1
uart1_init();

// Initialize LCD
LCD_Init();
Initialize all the peripherals. The clock is configured to run at 200MHz. The dev board uses UART1 as its COM output.
1
2
static tflite::MicroErrorReporter micro_error_reporter;
error_reporter = µ_error_reporter;
MicroErrorReporter is a mechanism to print data that uses DebugLog(), which I mentioned before and was implemented in debug_log.c using UART. It is a subclass of ErrorReporter and TensorFlow uses ErrorReporter to report errors. By pointing MicroErrorReporter back to ErrorReporter we are letting TensorFlow use our UART to report errors.
Pointers are tricky!
1
2
3
4
5
6
7
8
9
10
model = tflite::GetModel(sine_model);

if(model->version() != TFLITE_SCHEMA_VERSION)
{
    TF_LITE_REPORT_ERROR(error_reporter,
  	                     "Model provided is schema version %d not equal "
  	                     "to supported version %d.",
  	                     model->version(), TFLITE_SCHEMA_VERSION);
  	return 0;
}
Let’s get a handler of our model and check if the model’s TFLite version is the same as our TFLite library version.
1
2
3
4
5
6
static tflite::ops::micro::AllOpsResolver resolver;

// Build an interpreter to run the model with.
static tflite::MicroInterpreter static_interpreter(model, resolver, tensor_arena, kTensorArenaSize,
                                                   error_reporter);
interpreter = &static_interpreter;
Next, create an instance of AllOpsResolver that allows TFLite Micro to use all the operation it needs to run inference. And then we create the interpreter, by providing it our model handler, the arena pointer, the ops handler, and the error reporting handler (so that it can print error messages).
1
2
3
4
5
6
7
// Allocate memory from the tensor_arena for the model's tensors.
TfLiteStatus allocate_status = interpreter->AllocateTensors();
if (allocate_status != kTfLiteOk)
{
    TF_LITE_REPORT_ERROR(error_reporter, "AllocateTensors() failed");
    return 0;
}
AllocateTensors() uses the memory that you allocated previously for the tensors defined by our model. And if you didn’t allocate enough memory previously this is where it will fail. So, keep an eye on the serial terminal.
1
2
model_input = interpreter->input(0);
model_output = interpreter->output(0);
This is where we get the handlers of our model’s input and output buffer.
As we want to generate a continuous sine wave and x is a float number, the possible number between 0 to 2pi is quite large. To limit that we will decide beforehand how many x_value we will use i.e. the number of inferences we want to do.
1
2
3
4
const float INPUT_RANGE = 2.f * 3.14159265359f;
const uint16_t INFERENCE_PER_CYCLE = 70;

float unitValuePerDevision = INPUT_RANGE / static_cast<float>(INFERENCE_PER_CYCLE);
We divide the INPUT_RANGE with the number of inferences to get the unit value for x. In the infinite loop, we will use a for loop to generate the inference number and multiply it with the unit value to generate x.
1
2
3
4
5
6
7
8
9
10
11
12
13
14
15
16
17
18
19
20
21
22
23
24
25
while (1)
{
    // Calculate an x value to feed into the model
    for(uint16_t inferenceCount = 0; inferenceCount <= INFERENCE_PER_CYCLE; inferenceCount++)
    {
        float x_val = static_cast<float>(inferenceCount) * unitValuePerDevision;

        // Place our calculated x value in the model's input tensor
        model_input->data.f[0] = x_val;

        // Run inference, and report any error
        TfLiteStatus invoke_status = interpreter->Invoke();
        if (invoke_status != kTfLiteOk)
        {
            TF_LITE_REPORT_ERROR(error_reporter, "Invoke failed on x_val: %f\n", static_cast<float>(x_val));
            return 0;
        }

        // Read the predicted y value from the model's output tensor
        float y_val = model_output->data.f[0];

        // Do something with the results
        handle_output(error_reporter, x_val, y_val);
    }
}
We call the interpreter->Invoke() to run the inference on the input. handle_output() is used to do whatever you want to do with the result. It also takes the error_reporter handler so that it can at least print the results on a serial terminal.
1
2
3
4
5
6
7
8
9
void handle_output(tflite::ErrorReporter* error_reporter, float x_value, float y_value)
{
	// Log the current X and Y values
	TF_LITE_REPORT_ERROR(error_reporter, "x_value: %f, y_value: %f\n", x_value, y_value);

	// A custom function can be implemented and used here to do something with the x and y values.
	// In my case I will be plotting sine wave on an LCD.
	LCD_Output(x_value, y_value);
}
As I wanted to print the result on an LCD, I called my LCD_Output() function using the x and y value.
And that is it. I hope you enjoy reading this as much as I enjoyed writing this. This is not supposed to be a comprehensive tutorial but merely to help you get started.
If you want to learn more about TensorFlow, this crash course by Google might come handy.