This article is also available on medium.
I was part of a team building an ML-driven, vision-based self-checkout system. The platform uses multiple cameras to capture product images, which are then passed to a model for identification. We deployed on Nvidia Jetson AGX Orin edge devices, powerful for their size, but nowhere near desktop-class performance.
We had a problem. Our application couldn’t process frames fast enough to keep up with the camera feed. Frames were piling up, detections were lagging, and real-time operation was impossible. The stakes were high. Without fixing this performance bottleneck, our product wouldn’t make it to production. The team was quietly discussing expensive hardware upgrades as a last resort.
Then came the turning point. Someone suggested investigating OpenCV-CUDA. As I dove into the documentation, I discovered that our Jetson devices had integrated Nvidia GPUs sitting idle, untapped parallel processing power. While researching OpenCV-CUDA, I stumbled upon CuPy, a NumPy-compatible library that could accelerate our numerical operations on the GPU.
The results were transformative. By leveraging CUDA through OpenCV and CuPy, we achieved 5-48x speedups on critical operations. Suddenly, we could process frames faster than they arrived. Real-time detection became a reality, and we shipped the product to production, all without expensive hardware upgrades.
In this article, I’ll show you exactly how I did it, with practical examples and timing profiles demonstrating how OpenCV-CUDA and CuPy can unlock massive performance gains on GPU-enabled hardware.
Prerequisites
The technologies I’ll be using:
- Nvidia Jetson AGX Orin (other Linux machines with Nvidia GPU should work, though I haven’t verified this)
- Python 3.11.X. Use
pyenvto switch between Python versions. (How to use pyenv) UVPackage and Project Manager (How To Install UV)
Setting Up The Project
1. Clone the Repository
Clone the repo to follow along:
1
git clone https://github.com/mirzafahad/opencv-cupy-cuda-benchmarks.git
2. Check Your CUDA Compiler Version
Jetson devices come with the Jetpack SDK, which includes the Nvidia CUDA compiler. Let’s verify the compiler version:
1
2
3
4
5
6
$ nvcc --version
nvcc: NVIDIA (R) Cuda compiler driver
Copyright (c) 2005-2022 NVIDIA Corporation
Built on Sun_Oct_23_22:16:07_PDT_2022
Cuda compilation tools, release 11.4, V11.4.315
Build cuda_11.4.r11.4/compiler.31964100_0
In my case, I have V11.4, so I’ll need the cupy-cuda11x Python package, which is already included in the pyproject.toml file. If you have a different compiler version, update the toml file with the appropriate package before proceeding.
3. Install Packages Using UV
Make sure UV is installed:
1
uv --version
Execute sync to install packages from the toml file:
1
2
cd opencv-cupy-cuda-benchmarks
uv sync
This creates a virtual environment in the project directory and installs all packages from the toml file. We’ll install OpenCV with CUDA support separately.
4. Set Up Environment Variables
While we are inside the project directory, we’ll capture some directory paths as environment variables. These tell the OpenCV build process where to find your Python installation and packages. Run the following commands:
1
2
3
4
5
UV_PYTHON=$(uv run which python)
UV_INCLUDE=$(uv run python -c "from sysconfig import get_paths; print(get_paths()['include'])")
UV_PACKAGES=$(uv run python -c "import site; print(site.getsitepackages()[0])")
UV_NUMPY=$(uv run python -c "import numpy; print(numpy.get_include())")
UV_LIBRARY=$(uv run python -c "import sysconfig; print(sysconfig.get_config_var('LIBDIR'))")
Verify these environment values by printing them. You should see output similar to this (Note: the following is an example what I see on my machine. Instead of fahad you will probably see the user you are using.):
1
2
3
4
5
6
7
8
9
10
$ echo "Python: $UV_PYTHON"
Python: /home/fahad/opencv-cupy-cuda-benchmarks/.venv/bin/python
$ echo "Include: $UV_INCLUDE"
Include: /home/fahad/.pyenv/versions/3.11.13/include/python3.11
$ echo "Packages: $UV_PACKAGES"
Packages: /home/fahad/opencv-cupy-cuda-benchmarks/.venv/lib/python3.11/site-packages
$ echo "Numpy: $UV_NUMPY"
Numpy: /home/fahad/opencv-cupy-cuda-benchmarks/.venv/lib/python3.11/site-packages/numpy/_core/include
$ echo "Library: $UV_LIBRARY"
Library: /home/fahad/.pyenv/versions/3.11.13/lib
Note: UV_INCLUDE can point to either your system’s path (in my case, I’m using pyenv) or your virtual environment’s path and both are correct.
Installing OpenCV-CUDA in Your Project’s Virtual Environment
Installing OpenCV with CUDA support requires building from source, as the pip package doesn’t include CUDA support. Once built, we’ll copy the binary files into our virtual environment.
1. Install System Dependencies
1
2
3
4
5
6
sudo apt-get update
sudo apt-get install -y build-essential cmake git pkg-config libgtk-3-dev \
    libavcodec-dev libavformat-dev libswscale-dev libv4l-dev \
    libxvidcore-dev libx264-dev libjpeg-dev libpng-dev libtiff-dev \
    gfortran openexr libatlas-base-dev python3-dev python3-numpy \
    libtbb2 libtbb-dev libdc1394-dev libeigen3-dev
2. Clone and Configure OpenCV
1
2
3
4
5
6
7
cd ~
git clone https://github.com/opencv/opencv.git
git clone https://github.com/opencv/opencv_contrib.git
cd opencv
git checkout 4.10.0  # or your preferred version
cd ../opencv_contrib
git checkout 4.10.0
3. Build OpenCV
The following CMake configuration tells OpenCV to build with CUDA support. The key flags are:
WITH_CUDA=ON: Enables GPU acceleration.CUDA_ARCH_BIN="8.7": Optimizes for Jetson AGX Orin’s GPU architecture (adjust if using different hardware).ENABLE_FAST_MATH=ONandCUDA_FAST_MATH=ON: Enable mathematical optimizations for speed.- The
PYTHON3_*flags: Point to your UV virtual environment so OpenCV installs there.
1
2
3
4
5
6
7
8
9
10
11
12
13
14
15
16
17
18
19
20
21
22
23
mkdir ~/opencv/build
cd ~/opencv/build

cmake -D CMAKE_BUILD_TYPE=RELEASE \
    -D CMAKE_INSTALL_PREFIX=/usr/local \
    -D OPENCV_EXTRA_MODULES_PATH=~/opencv_contrib/modules \
    -D WITH_CUDA=ON \
    -D CUDA_ARCH_BIN="8.7" \
    -D CUDA_ARCH_PTX="" \
    -D ENABLE_FAST_MATH=ON \
    -D CUDA_FAST_MATH=ON \
    -D WITH_CUBLAS=ON \
    -D WITH_CUDNN=ON \
    -D OPENCV_DNN_CUDA=ON \
    -D WITH_GSTREAMER=ON \
    -D BUILD_opencv_python3=ON \
    -D PYTHON3_EXECUTABLE=$UV_PYTHON \
    -D PYTHON3_INCLUDE_DIR=$UV_INCLUDE \
    -D PYTHON3_LIBRARY=$UV_LIBRARY/libpython3.11.so \
    -D PYTHON3_PACKAGES_PATH=$UV_PACKAGES \
    -D PYTHON3_NUMPY_INCLUDE_DIRS=$UV_NUMPY \
    -D OPENCV_PYTHON3_INSTALL_PATH=$UV_PACKAGES \
    -D BUILD_EXAMPLES=OFF ..
After cmake finishes, look for a section in the output that says:
1
2
3
4
5
--   Python 3:
--     Interpreter:        ...
--     Libraries:          ...
--     numpy:              ...
--     install path:       ...
Here’s what it looks like on my machine (Note: Notice the path has my username):
1
2
3
4
5
6
Python 3:
--   Interpreter:   /home/fahad/opencv-cupy-cuda-benchmarks/.venv/bin/python (ver 3.11.13)
--   Libraries:     /home/fahad/.pyenv/versions/3.11.13/lib/libpython3.11.so (ver 3.11.13)
--   Limited API:   NO
--   numpy:         /home/fahad/opencv-cupy-cuda-benchmarks/.venv/lib/python3.11/site-packages/numpy/_core/include (ver 2.3.3)
--   install path:  /home/fahad/opencv-cupy-cuda-benchmarks/.venv/lib/python3.11/site-packages/cv2/python-3.11
4. Run the make command
1
make -j$(nproc)
This will take 1-2 hours. After completion, verify the Python bindings were built:
1
ls ~/opencv/build/lib/python3/
You should see a .so file. Then install:
1
2
sudo make install
sudo ldconfig
Now verify that your virtual environment has the cv2 files:
1
ls -la ~/opencv-cupy-cuda-benchmarks/.venv/lib/python3.11/site-packages/cv2/
You should see numerous files. Finally, test the installation:
1
2
cd ~/opencv-cupy-cuda-benchmarks
uv run python -c "import cv2; print(cv2.__version__); print('CUDA devices:', cv2.cuda.getCudaEnabledDeviceCount())"
On my Jetson device, this prints:
1
2
4.10.0
CUDA devices: 1
If you see similar output, congratulations! You now have OpenCV 4.10.0 with CUDA support installed in your UV-managed Python project.
Quick Verification of CUDA Modules
Before running the full benchmarks, it’s good practice to verify that CUDA modules are working correctly. This quick sanity check tests the complete GPU workflow: uploading data to GPU, processing it, and downloading results back to CPU.
1
2
3
4
5
6
7
8
9
10
11
12
13
14
import cv2
import numpy as np

img = cv2.imread('image.jpg')

# Upload image to GPU.
gpu_img = cv2.cuda.GpuMat()
gpu_img.upload(img)

# Process on GPU.
gpu_gray = cv2.cuda.cvtColor(gpu_img, cv2.COLOR_BGR2GRAY)

# Download back to CPU
cpu_gray = gpu_gray.download()
If this code runs without exceptions, your OpenCV-CUDA installation is working correctly. If you get errors (like AttributeError or cv2.error), it means CUDA modules aren’t properly installed, revisit the installation steps above.
OpenCV-CUDA Benchmark
I will benchmark CPU vs GPU performance for background subtraction using OpenCV’s MOG (Mixture of Gaussians) algorithm. Background subtraction identifies which parts of an image have changed. Imagine separating a person walking through a scene from the static background behind them. MOG works by building a statistical model of what the “normal” background looks like, then flagging anything different as foreground.
I’ll compare standard OpenCV (CPU) implementation against OpenCV CUDA (GPU) implementation on:
- Static images: Repeated processing of the same image simulates a camera watching an unchanging scene (like an empty room).
- Video file: Real motion tests how well the algorithm adapts to dynamic changes (like people moving).
OpenCV provides two different implementations of the same MOG algorithm, one for CPU and one for GPU:
1
2
3
4
5
6
import cv2
# CPU version: runs on your processor.
bg_subtractor = cv2.bgsegm.createBackgroundSubtractorMOG()

# GPU version: runs on your CUDA-enabled GPU.
bg_subtractor = cv2.cuda.createBackgroundSubtractorMOG()
You choose one based on where you want the processing to happen. The CPU version works on any machine, while the GPU version requires CUDA but runs much faster.
Test 1: Static Background
For the static background test, I process the same image repeatedly for 150 iterations. Why 150? To match the video test duration. My test video is 10 seconds at 15fps (150 frames total). This ensures a fair comparison between the two tests.
1
2
3
image = cv2.imread(image_file)
for _ in range(150):
    bg_subtractor.apply(image, learningRate=0.1)
The learningRate=0.1 parameter controls how quickly the algorithm adapts to changes. It ranges from 0.0 to 1.0, where lower values make the background model update more slowly, useful for distinguishing temporary changes (like a person walking by) from permanent ones (like furniture being moved).
For CUDA, we also need two additional concepts: CUDA streams and GPU matrices.
CUDA Stream: Think of this as a “work queue” for the GPU. It’s like a conveyor belt where you can place tasks and the GPU processes them in order without making the CPU wait around. Multiple streams can run in parallel, like having multiple conveyor belts working simultaneously.
GPU Matrix (GpuMat): This is OpenCV’s way of storing image data directly in the GPU’s memory (VRAM) rather than your computer’s regular memory (RAM). To process something on the GPU, you first upload it from the CPU, do the work there, then download it back when done. While moving data between the two adds some time, the GPU’s processing speed more than makes up for it.
1
2
3
4
5
6
7
8
bg_subtractor = cv2.cuda.createBackgroundSubtractorMOG()
stream = cv2.cuda_Stream()
gpu_frame = cv2.cuda_GpuMat()

for _ in range(150):
    gpu_frame.upload(image)
    gpu_foreground_mask = bg_subtractor.apply(gpu_frame, learningRate=0.1, stream=stream)
    gpu_foreground_mask.download()
Important benchmarking considerations:
- GPU warm-up: Like a car engine, GPUs perform better after they’ve “warmed up.” The first few operations compile and optimize code (called JIT compilation). We run warm-up iterations first so our timing measurements reflect real-world performance, not startup overhead.
- Synchronization: GPUs work asynchronously, they accept work orders and process them independently while the CPU continues doing other things. To measure GPU timing accurately, we must tell the CPU to wait until the GPU truly finishes all work before stopping the timer.
Both of these are handled in the code.
To run the code:
1
2
cd ~/opencv-cupy-cuda-benchmarks
uv run python src/benchmark/bg_subtraction_benchmark.py
Results
The benchmark results are shown in the following image:
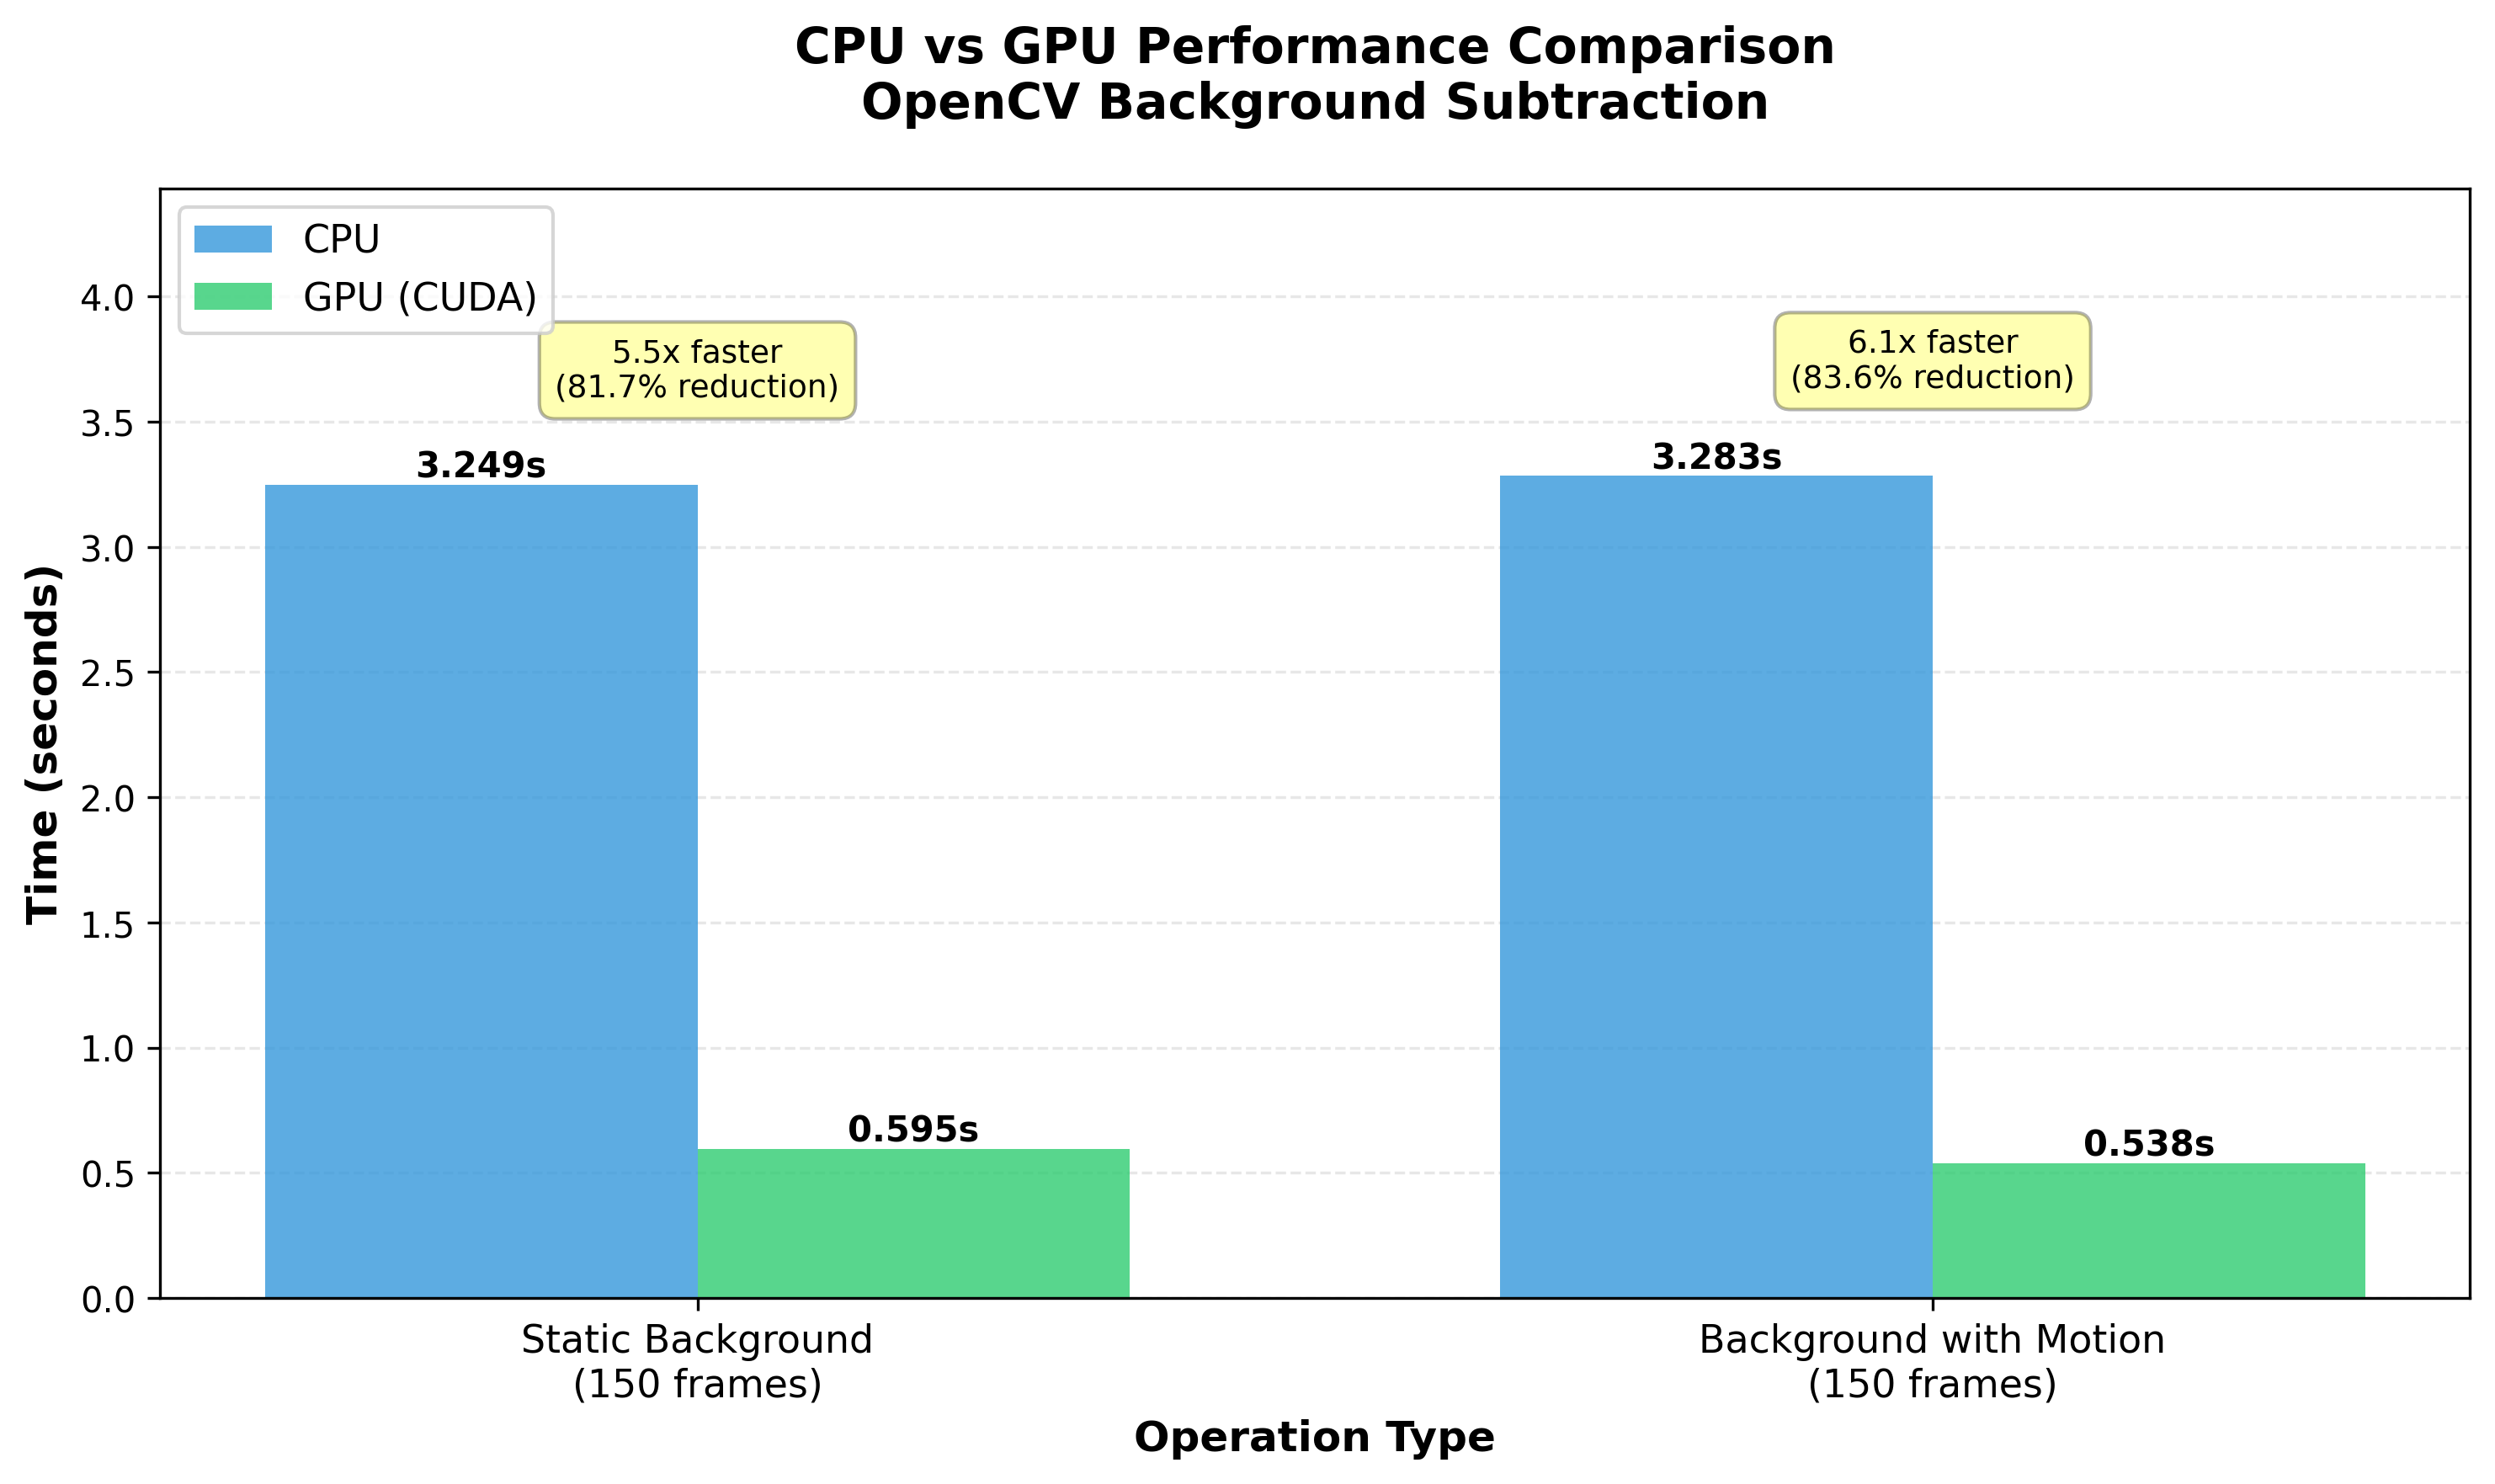
The results demonstrate substantial performance improvements with GPU acceleration:
Static Background Test:
- CPU: 3.25 seconds
- GPU: 0.60 seconds
- Speedup: ~5.5x faster (82% reduction in processing time)
Background with Motion (Video) Test:
- CPU: 3.28 seconds
- GPU: 0.54 seconds
- Speedup: ~6.1x faster (84% reduction in processing time)
The GPU version is consistently 5-6x faster than CPU, even with the overhead of uploading frames to GPU memory and downloading results back to CPU. This speedup means you could process 6 video streams on the GPU in the same time it takes to process 1 stream on the CPU. A game changer for multi-camera applications.
CuPy Benchmark
In this section, I’ll compare CPU (NumPy) and GPU (CuPy) performance for batch image normalization, a common preprocessing step in deep learning. Normalization rescales pixel values to a standard range, making neural networks train more effectively. Think of it like converting different currencies to US dollars so you can compare prices fairly.
I’ll test three scenarios using six images:
- NumPy (CPU): Traditional CPU processing.
- CuPy (GPU → CPU): GPU processing but copying results back to CPU memory, like using a supercomputer then printing the results on paper for local use.
- CuPy (GPU → GPU): GPU processing with results staying in GPU memory. This is beneficial when downstream operations (like GPU-based inference with TensorRT) can continue processing on the GPU, eliminating CPU-GPU transfer overhead, there’s no copying back and forth.
To run the code:
1
2
cd ~/opencv-cupy-cuda-benchmarks
uv run python src/benchmark/cupy_benchmark.py
Results
The benchmark results are shown in the following image:
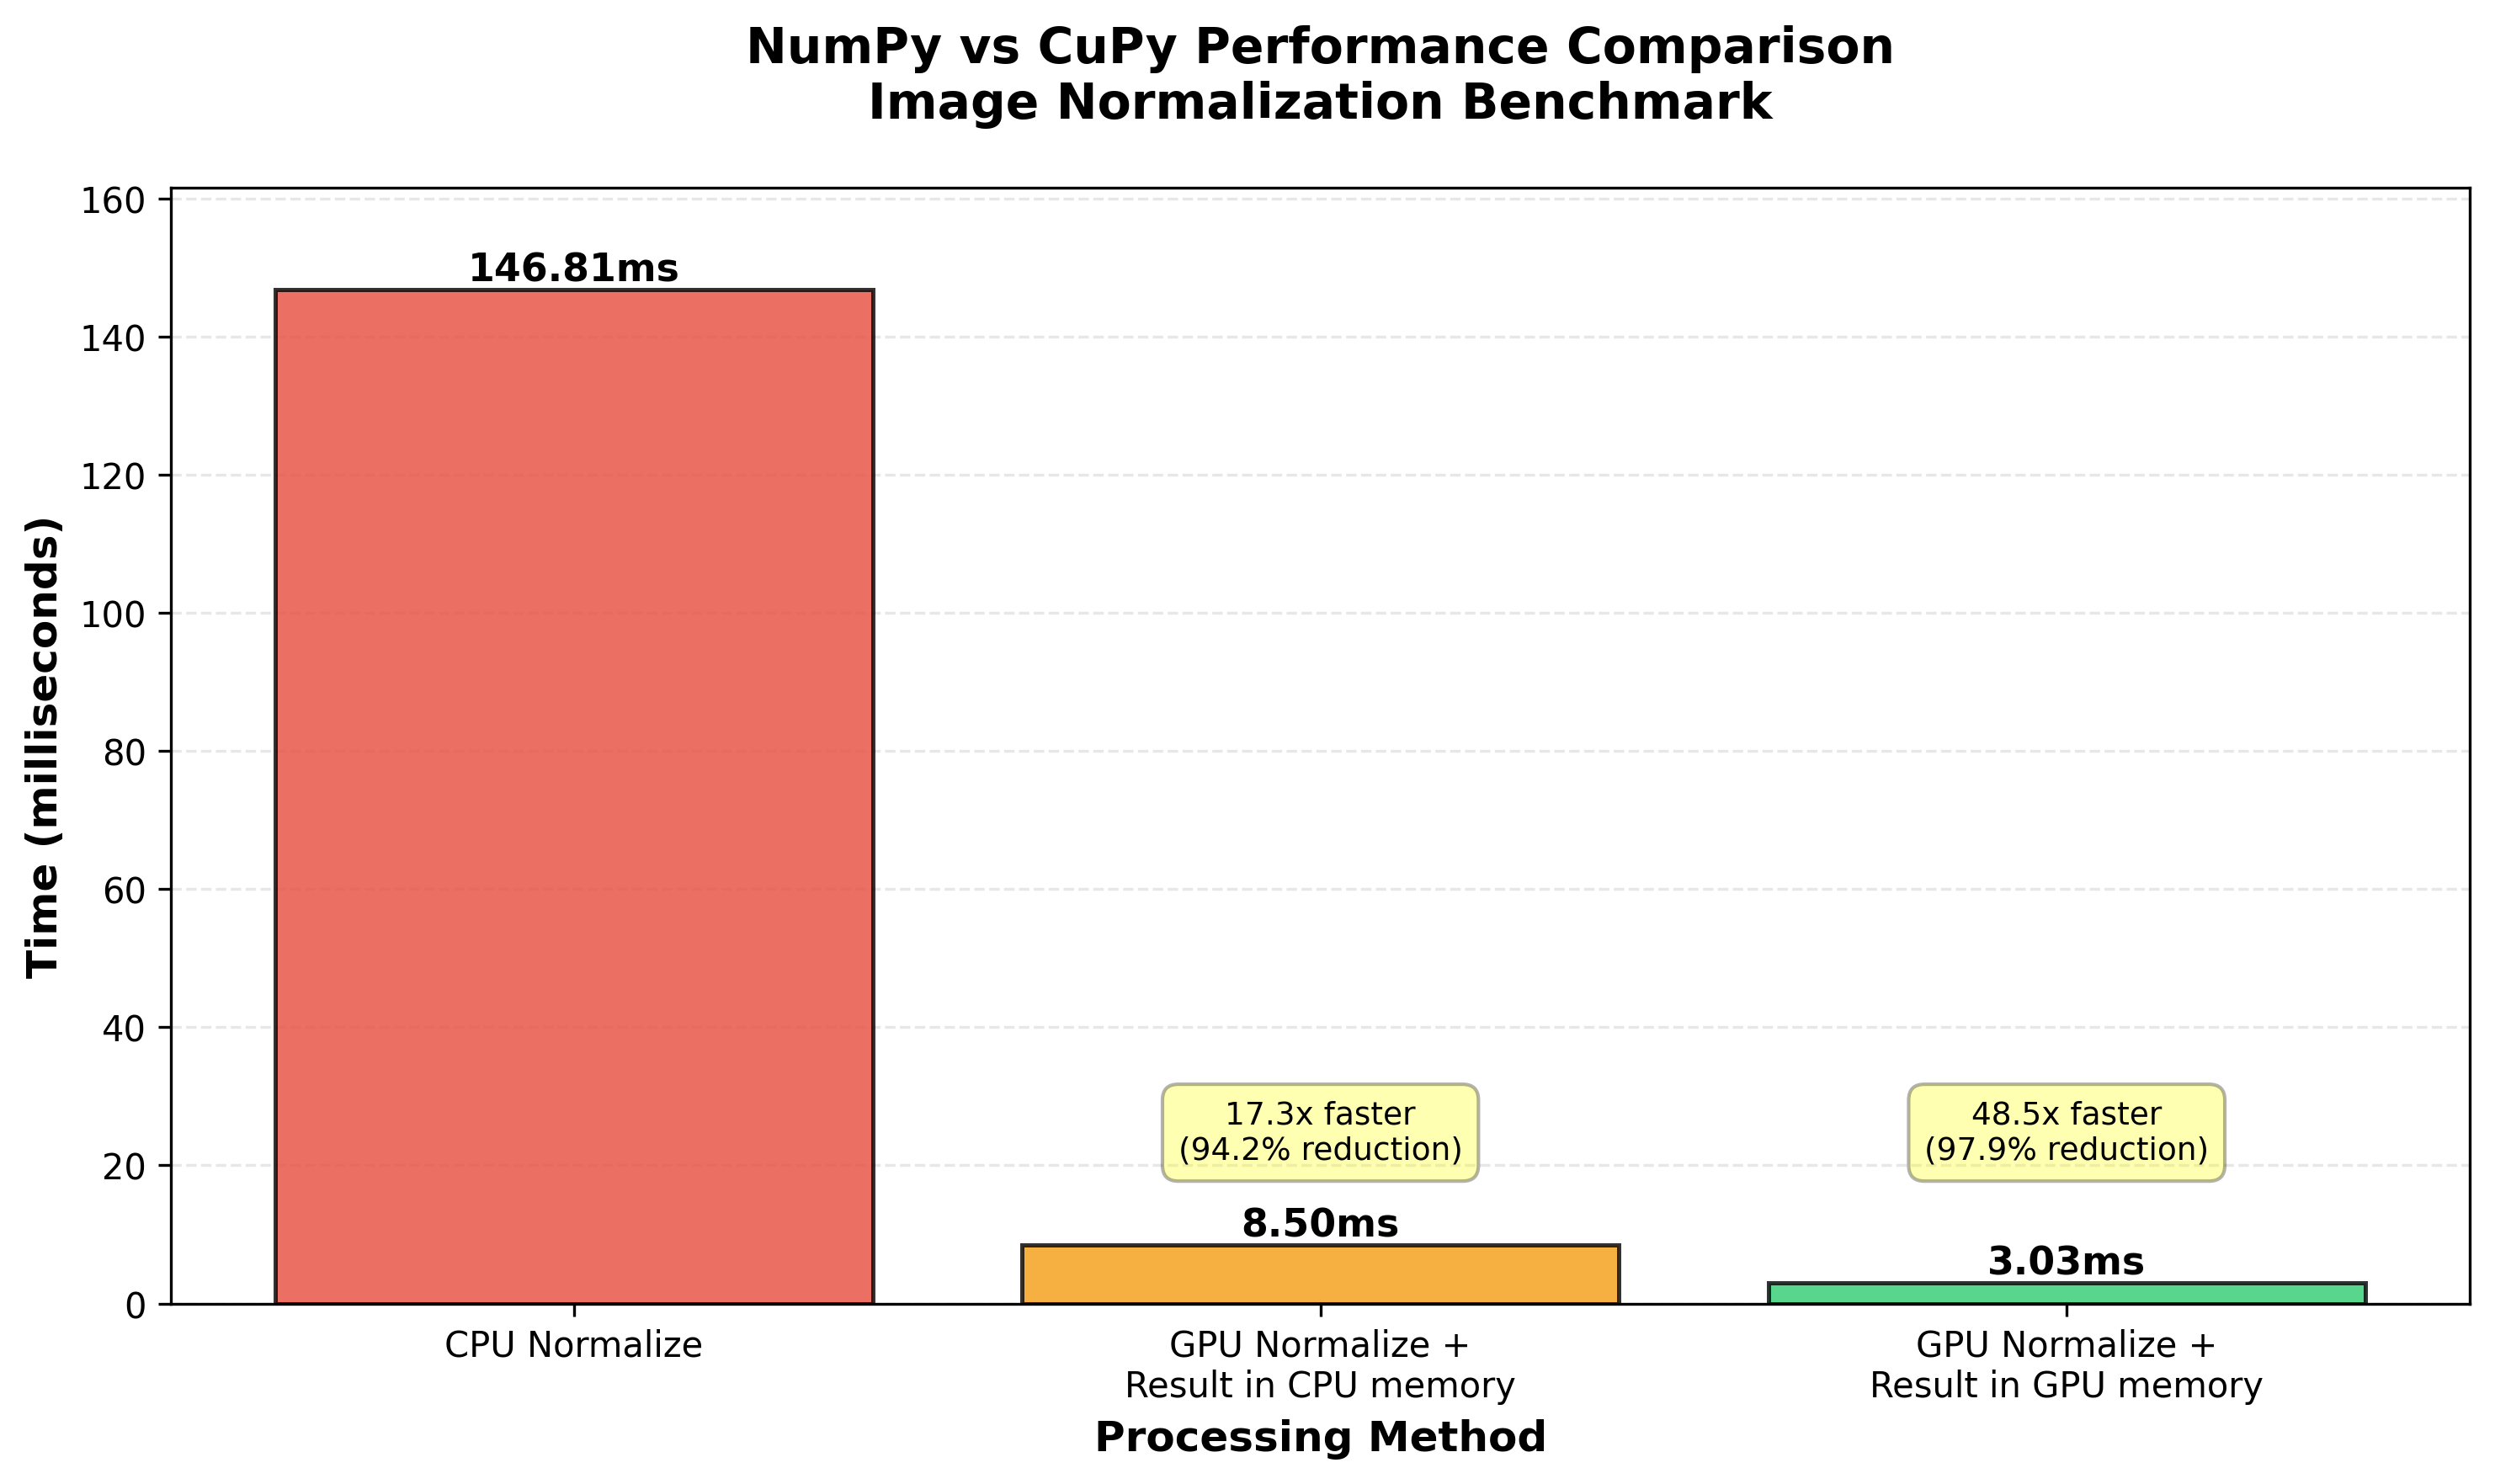
The performance differences are dramatic:
Normalization Performance (6 images):
- CPU (NumPy): 146.81ms
- GPU → CPU (CuPy with download): 8.50ms
- GPU → GPU (CuPy, stays in GPU): 3.03ms
Key Insights:
- GPU with CPU download is ~17x faster than pure CPU processing.
- GPU keeping data in GPU memory is ~48x faster than CPU processing.
- Eliminating the GPU→CPU transfer makes GPU processing 2.8x faster than with the transfer.
This benchmark highlights why keeping data on the GPU throughout your pipeline is crucial. If your next operation can also run on the GPU (like feeding normalized images into a GPU-based inference engine), you can achieve massive speedups by avoiding memory transfers entirely.
Conclusion
These benchmarks demonstrate the substantial performance gains achievable through GPU acceleration using CUDA. Both OpenCV-CUDA and CuPy provide significant speedups for computationally intensive operations, making them invaluable for resource-constrained edge devices and high-throughput applications.
Key takeaways:
- GPU acceleration shines for batch operations and repetitive computations.
- Memory transfer overhead (CPU ↔ GPU) is real but often outweighed by computation gains.
- Keeping data on the GPU throughout your pipeline maximizes performance.
- Warm-up iterations are essential for accurate GPU benchmarking.
When building vision or ML applications on Nvidia hardware, leveraging CUDA can transform your application’s performance from barely viable to production-ready.